Day: prosthesis
Character Make Up the Palio of Pomarance, 2011
by Stefano on Sep.15, 2011, during Body Painting, Events, Make Up
The Palio of Pomarance, less famous than that of Siena, but certainly equally spectacular, Each year sees challenge in theater the city's inhabitants divided into four districts, assessed at the end of the event by a jury of industry professionals.
Also this year (I had already worked with the district of 'The Centre’ in 2008) I took part in the realization of the performance as head of makeup, assisted in the execution of the make-up of actors and extras from Giorgia and two girls of the district.
Makeup and costumes are original inspiration in the comic 'Cavalier of Gommasgonfia', in which Don Quixote, after a period of inactivity, back into the spotlight, But in a society that no longer belong to him anymore, driven by love for his Dulcinea will be to challenge a world dominated by technology.
The show takes place in a choreography and then strictly in black and white, to remind the viewer the idea of comics, bulwark of amusement yesterday that the company wants to challenge what it is today, the wrong side of the multimedia: chat e interent, strictly color.
So,the show was held, the length of just over 20 minutes, that has staged 87 between actors and extras, All make-up on the spot and eventually won the Palio as a better representation.
All the characters have been loaded with water-based paints, the bottom of which is lying on the sponge or airbrush, and to complete the trick has been applied prosthetic noses made of latex (Hence the creation of the backstage) , cap, mustaches and beards.
To fix the makeup on your face I used the hairspray, that has been sorely tested by the hot temperatures of the day.
 |
 |
How to make vampire teeth
by Stefano on Mar.11, 2010, during Special Effects
Here is the backstage for the construction of a denture (it is actually a crown) realism of undisputed, highly effective in making short films, live events, cosplay or just for a change’ their look depending on the mode.

L’ need is available in all stores for dentists or dental, possibly also at a good price online.
Materials needed:
- An impression tray top of the desired size
- Alginate per imprint, slow.
- Gypsum powder.
- Disposable latex gloves.
- Dough or put.
- Vaseline.
- Resin for provisional.
- Pre-vulcanized liquid latex
- Bototalco
- Silicone Impression (it only takes a small amount)
- any water-based acrylic colors

The first step is to take an impression of the teeth. This is done using the special tray and a fair mixture of water and alginate (I use Neocolloid, which is also excellent for making the cast of the face or any part of the body).
Once the slurry has been stabilized and hardened (by 3 to 5 minutes) you can clean the mouth and fill with a mixture of water and gypsum. Council to do this in two stages: the first with a very liquid mixture that is stratified throughout the footprint, It need operation during which tap the table, is to remove small air bubbles present, that in order to enable the plaster to make every detail present on the mold.
The second, every few minutes from the first, a little more dense, as a filler.
After a period ranging from 20 minutes 2 hours, depending on the plaster you have chosen, Your positive is ready.
If you have a latex liquid, I recommend using it to coat the stamp with a light film, Dab with talcum powder: This will make it much easier to loose the prosthesis as well as give a slight 'game’ made to the crown, that make it more comfortable and durable.
On the positive thus created and covered by a layer of latex, it is now possible to model your new teeth with the plasticine or clay.
After work cover everything with a thin layer of vaseline, that, as well as allow the posting of the counter that we will achieve, is also useful to give a good polish to the whole tooth.

The prototype so grossed must be placed in the freezer for a couple of hours, so that the plasticine or clay to take a good consistency.
After such an interval may be made to make the mold with key (that is, with a detail, such as a small pin located on the palate) allowing for the repositioning of the same counter.
To accomplish the latter you can use different types of materials, but I have experimentally verified that the best is the silicone impression (Flexitime EasyPutty), that breaks away from the plaster once catalyzed, is flexible and allows slight undercuts, separating the resin and is reusable !
Wait until the counter that you cast or molded on the model is hard, and disconnect it from your work again. Make sure that the work done so far has managed well and remove the dough from the positive (and if present in trace, also from the negative).
Now comes the most delicate moment, the realization of the real prosthesis molding.
Given the nature of the used substances near, I suggest you work in a well ventilated place and using latex gloves.
Liquid and powder (I used a medium color Duralay clear) be blended in appropriate quantities (about 1:1) and then poured into the mold, closed immediately with good positioning with the key you created earlier. Obviously a soft mold will make it much easier being removed.

After a variable time between half an hour and 2 hours depending on the resin used can be removed to cut the crown, remove small imperfections, lucidarla, and colored end.
In some of the attached pictures you can see how he left a large area of coverage on the gums. This is not always necessary, rather, often the most realistic prosthesis cover only the teeth. A skilful use of color and a couple of coats of clear gloss will give your life to finally sighed work.
 |
 |
 |
Plaster cast |
Model in clay |
Controstampo in silicone |
 |
 |
 |
Prosthetics printed |
Finished prosthesis |
Prosthetics colored |
Cornus devil latex
by Stefano on Feb.22, 2010, during Special Effects
Today I'll show how to achieve simplicity with a small pair of devil horns in the pre-vulcanized liquid latex.
Necessary:
- Clay modeling (I use the Pongo, cheaper and readily available)
- Gypsum powder (if we do not want a particularly precise and richly detailed plaster and it is also by those who sell items for construction will be fine)
- Vaseline (available from hardware)
- Pre-vulcanized liquid latex (in this case I chose cheap material available in a shop of fine arts)
- A container that can accommodate our model the size of just over (achievable in Caroncini or simply by cutting a plastic bottle)
Once identified by eye the size of our model (a horn in this case) we start the modeling phase with Pongo, placed on a flat base isolated from the work table with a sheet of paper, trying to give a rounded shape and concave at the base.
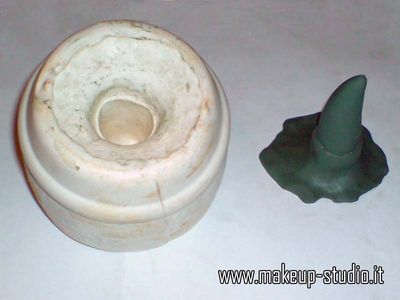
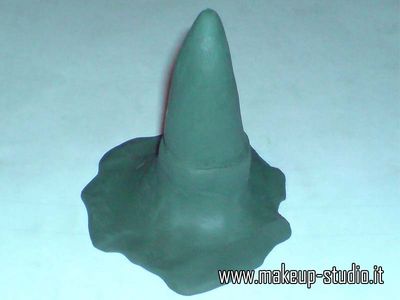 Obtained the desired shape, and added some detail to increase the realism (For example, vertical stripes on the bone or the horn in a simple orange peel on the skin) you must place the model in a suitable container (which may be a small cardboard box made to measure or, as in my case, the bottom of a plastic bottle), up at least a few centimeters more than the model, and distribute on the surface in a delicate (preferably with a brush) the vaseline will work to release.
After that you can make the plaster and fill the container that, until it completely covers our model (that, course will remain open at the base (face which touches the bottom of the box or bottle) and not be undercut, permetterene for rapid and effective removal.
Once you have the mold (the negative) will be sufficient:
- apply a thin layer of vaseline
- stratification 3/4 levels of pre-vulcanized liquid latex, buffered with talcum powder from time to time, when dry
to create many replicas of our model.
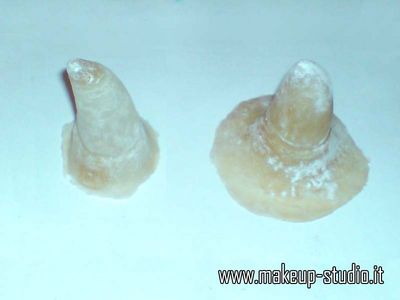
To get a good result the Board to pay small amounts at a time of latex into the mold, mold to be rotated so that the liquid latex adheres well to the boundary. To speed up the drying time may exercise useful to have a hair dryer, to be used at low speeds and at a distance of at least 10/15 inches from the mold.
The outer rim is the most delicate part of the work: more will be thin more 'invisible’ will be the application of the prosthesis. To achieve this it is usually sufficient to reduce a layer of latex outer part, remaining inner layers with subsequent.