Special Effects
The teeth of the Lola
by Stefano on Nov.07, 2011, during Special Effects, Events

After watching the video, kindly, our Memole posted Teeth on youtube that I realized, Lola, famous Drag Queen of the Art Club of Madame Sisi and friend for a long time, thought it could not be outdone. Of course, with some small change.
To descend even more into the character it, not at all interested in two sharp fangs as a vampire, but a beautiful arch of white teeth and sparkling, drittissimi, you can put on and off with ease, and without impediment during speech.
So, Once the cast taken, I went to work.
Following step by step the same steps described in the tutorial of vampire teeth, I made the model, mold and positive for both arches, with particular attention that the closure would remain good, namely, that the mouth is closed under the denture (jaw) adasse not to interfere with the upper teeth (jaw).
Here are some photos of the stages of construction.


How to create a fake nose for theatrical use latex
by Stefano on Oct.12, 2011, during Special Effects, Events
Here are step by step illustrated instructions on how I made the noses for a few characters of the Palio of Pomarance.
Since this is a play which did not require the likely make-up make-up film, and being the nose part of the face little flexible and deformable, I thought it was not necessary to use latex foam to achieve this type of prosthesis, but could also work well on liquid latex precured.
The first step in the realization of the prosthesis was then the study design (the whole show was created and developed around a comic) and the creation of the model.
 |
 |
Even with the positive provision of a nose (my! 🙂 ) plaster work on, and that I used as reference for the size, for convenience I made a table of all PVC (my kitchen cutting board).
After the modeling phase of the clay (Here I used the very common Pongo) and recreated a thin orange peel to simulate the effect of the skin, I used the cutout of the base of a bottle to surround the model and create a containment for the casting, as well suited in size, and then I poured the plaster to get the impression.
At this stage it is important to ensure that small air bubbles inevitably present in the water / gypsum leave, thus avoiding that create imperfections to the mold. To do this, fully paid after the plaster into the mold, just beat vigorously on the basis of which it supported the model, creating vibrations.
 |
 |
Obtained the mold and removing the model pose, which will leave the imprint 'clean', you can proceed to the first molding.
To do this you must pay a minimum amount of liquid latex mold inside, and then moving the same to make the latex go to cover only the areas concerned, preventing or oozing from the mold is at the bottom.
The mold should be left to air dry (if you want you can speed up the processs with a hair dryer) and at the end all be exposed to the latex powdered with talcum powder or neutral boron-. This will prevent the latex from sticking to itself during the extraction.
Generally a single layer of latex is very thin and is not sufficient to ensure that the prosthesis has achieved the required consistency, to make it more rigid, you can create other levels following the first, but left margins after 'climbing’ the distance 1/2 mm from the edge of the previously created, to ensure that the edges, remaining thinner, risultimo invisible once pasted.
 |
 |
Once you reach the desired thickness, powder for remembering everything well, you can proceed, by lifting a corner of the latex and shoved under a brush full of talcum powder, to pull the nose of the mold.
What should be done by becoming aware that the objectivity achieved not fold on itself, sticking beyond repair.
Below is presented as a separate noses from the plaster, ready to be applied and colored.
 |
 |
Zombie Make Up Tutorial – How to Become a Zombie !
by Stefano on Feb.23, 2011, during Special Effects, Events, Make Up

As promised a few days ago, here are some simple steps to achieve in a short time and with materials readily available from a nice trick Zombie, On the subject saw the carnival imminent or partner if you want to remove some’ troppo assillanti 🙂
Materials needed:
- White base for facepainting (excellent even in the clown makeup cream)
- Black pencil make-up
- Color fire red (well only a lipstick)
- Pre-vulcanized liquid latex (alternatively a layer of toilet paper and PVA glue)
- possibly a correction / economic foundation
How to proceed:
Apply with a sponge in the liquid latex to the cheeks and make it dry using a hair dryer. In the event that you do not have the latex (mesticheria or sell it in stores a few colors €) can be done as follows:
Separated by a piece of toilet paper (or a paper towel) two-ply, tear so that it follows an approximate outline of the cheeks (you could get two more or less oval) and paste to the face, one cheek, using PVA glue as a bonding agent diluted in a bit’ d’acqua, being careful to apply the glue to the side of oval, and not in the middle.
 |
 |
When finished you can proceed to slightly whiten his face, as the most preferred white forehead, the nose and cheekbones.
 |
 |
Apply now some’ black eyes: over the entire upper eyelid and lower eyelid, surrounding the whole eye.
Wait for it to dry out a bit’ (in case you're using water colors) then mix it with a bit’ sfumatelo on lipstick and white: the objective is to achieve a dark purple.
 |
 |
Now, with a pencil or black color on the cheeks create a chiaroscuro: the goal is to give an idea of emptying, then you can proceed to break the latex or toilet paper in vertical strips, coloring the underlying skin with red lipstick, To give an idea of the flesh.
 |
 |
Finally, color the tip of the nose and lips with black.
If you're using a pencil ol'eyeliner can score some interesting cross line, thin lips, not too long, giving the idea of a lip that is breaking.
 |
 |
The concealer or the foundation may be useful at this point if we realize that we have exaggerated with the white or black and white will fade further (apply it to lighten the black, then fade to white).
If we want to add some more details, We can draw two parallel lines on the forehead and round, by then fade out, to give an idea of the passage of a large vein or the skin is breaking.
 |
 |
A red halo around the mouth and stains like blood spatter made will make it more gruesome and terrifying your creation..

Neck and hand colored the same color of the face , and uncombed hair properly and fixed with a bit’ spray or foam to make you worthy of revival from death …

How to make vampire teeth
by Stefano on Mar.11, 2010, during Special Effects
Here is the backstage for the construction of a denture (it is actually a crown) realism of undisputed, highly effective in making short films, live events, cosplay or just for a change’ their look depending on the mode.

L’ need is available in all stores for dentists or dental, possibly also at a good price online.
Materials needed:
- An impression tray top of the desired size
- Alginate per imprint, slow.
- Gypsum powder.
- Disposable latex gloves.
- Dough or put.
- Vaseline.
- Resin for provisional.
- Pre-vulcanized liquid latex
- Bototalco
- Silicone Impression (it only takes a small amount)
- any water-based acrylic colors

The first step is to take an impression of the teeth. This is done using the special tray and a fair mixture of water and alginate (I use Neocolloid, which is also excellent for making the cast of the face or any part of the body).
Once the slurry has been stabilized and hardened (by 3 to 5 minutes) you can clean the mouth and fill with a mixture of water and gypsum. Council to do this in two stages: the first with a very liquid mixture that is stratified throughout the footprint, It need operation during which tap the table, is to remove small air bubbles present, that in order to enable the plaster to make every detail present on the mold.
The second, every few minutes from the first, a little more dense, as a filler.
After a period ranging from 20 minutes 2 hours, depending on the plaster you have chosen, Your positive is ready.
If you have a latex liquid, I recommend using it to coat the stamp with a light film, Dab with talcum powder: This will make it much easier to loose the prosthesis as well as give a slight 'game’ made to the crown, that make it more comfortable and durable.
On the positive thus created and covered by a layer of latex, it is now possible to model your new teeth with the plasticine or clay.
After work cover everything with a thin layer of vaseline, that, as well as allow the posting of the counter that we will achieve, is also useful to give a good polish to the whole tooth.

The prototype so grossed must be placed in the freezer for a couple of hours, so that the plasticine or clay to take a good consistency.
After such an interval may be made to make the mold with key (that is, with a detail, such as a small pin located on the palate) allowing for the repositioning of the same counter.
To accomplish the latter you can use different types of materials, but I have experimentally verified that the best is the silicone impression (Flexitime EasyPutty), that breaks away from the plaster once catalyzed, is flexible and allows slight undercuts, separating the resin and is reusable !
Wait until the counter that you cast or molded on the model is hard, and disconnect it from your work again. Make sure that the work done so far has managed well and remove the dough from the positive (and if present in trace, also from the negative).
Now comes the most delicate moment, the realization of the real prosthesis molding.
Given the nature of the used substances near, I suggest you work in a well ventilated place and using latex gloves.
Liquid and powder (I used a medium color Duralay clear) be blended in appropriate quantities (about 1:1) and then poured into the mold, closed immediately with good positioning with the key you created earlier. Obviously a soft mold will make it much easier being removed.

After a variable time between half an hour and 2 hours depending on the resin used can be removed to cut the crown, remove small imperfections, lucidarla, and colored end.
In some of the attached pictures you can see how he left a large area of coverage on the gums. This is not always necessary, rather, often the most realistic prosthesis cover only the teeth. A skilful use of color and a couple of coats of clear gloss will give your life to finally sighed work.
 |
 |
 |
Plaster cast |
Model in clay |
Controstampo in silicone |
 |
 |
 |
Prosthetics printed |
Finished prosthesis |
Prosthetics colored |
Cornus devil latex
by Stefano on Feb.22, 2010, during Special Effects
Today I'll show how to achieve simplicity with a small pair of devil horns in the pre-vulcanized liquid latex.
Necessary:
- Clay modeling (I use the Pongo, cheaper and readily available)
- Gypsum powder (if we do not want a particularly precise and richly detailed plaster and it is also by those who sell items for construction will be fine)
- Vaseline (available from hardware)
- Pre-vulcanized liquid latex (in this case I chose cheap material available in a shop of fine arts)
- A container that can accommodate our model the size of just over (achievable in Caroncini or simply by cutting a plastic bottle)
Once identified by eye the size of our model (a horn in this case) we start the modeling phase with Pongo, placed on a flat base isolated from the work table with a sheet of paper, trying to give a rounded shape and concave at the base.
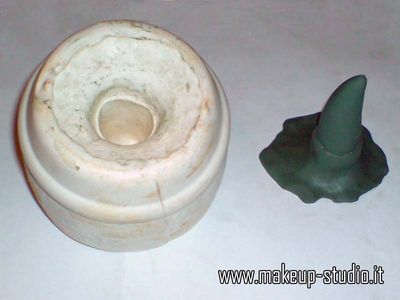
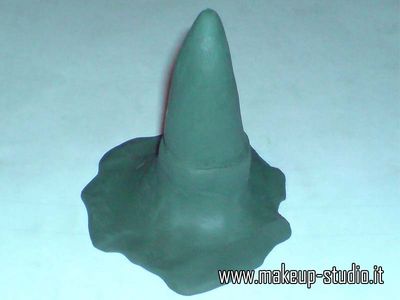 Obtained the desired shape, and added some detail to increase the realism (For example, vertical stripes on the bone or the horn in a simple orange peel on the skin) you must place the model in a suitable container (which may be a small cardboard box made to measure or, as in my case, the bottom of a plastic bottle), up at least a few centimeters more than the model, and distribute on the surface in a delicate (preferably with a brush) the vaseline will work to release.
After that you can make the plaster and fill the container that, until it completely covers our model (that, course will remain open at the base (face which touches the bottom of the box or bottle) and not be undercut, permetterene for rapid and effective removal.
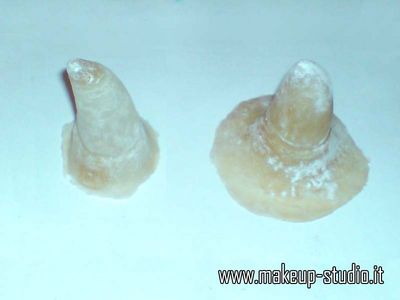
Once you have the mold (the negative) will be sufficient:
- apply a thin layer of vaseline
- stratification 3/4 levels of pre-vulcanized liquid latex, buffered with talcum powder from time to time, when dry
to create many replicas of our model.
To get a good result the Board to pay small amounts at a time of latex into the mold, mold to be rotated so that the liquid latex adheres well to the boundary. To speed up the drying time may exercise useful to have a hair dryer, to be used at low speeds and at a distance of at least 10/15 inches from the mold.
The outer rim is the most delicate part of the work: more will be thin more 'invisible’ will be the application of the prosthesis. To achieve this it is usually sufficient to reduce a layer of latex outer part, remaining inner layers with subsequent.