Day: make up
Make up for video production commercials Mutti
by Stefano on Jul.28, 2011, during Beauty, Events, Make Up
 |
Contacted by the agency that was responsible for directing and implementing the movie, I turned the white skin of the actor, in the tan of a farmer who spends his life in the countryside.
The trick has been achieved with a slightly orange cream base, lying on the sponge on the face and arms, buffered with a dark powder, and then airbrushed shaded in darker parts (backs of the arms, front, tip of the nose and cheekbones) with a chocolate brown color, to give the proper effect of a brownish skin and sunburned.
All this took place on location in the estates Mutti, at the foot of the castle of Torrechiara (Parma).
 |
Protected: Sharon: photo book and body painting
by Stefano on Jul.08, 2011, during Beauty, Body Painting, Events, Make Up
Body painting in the Art Club disco Madame Sisi
by Stefano on Jun.28, 2011, during Body Painting, Events
Outside the box this year the birthday of the famous 'Lola Fox', Drag Queen that for years now animates the nightlife nightclub Art Club Desenzano.
So, not to be outdone, with the most likeable Izzi we launched the construction of a usable body painting during the evening.
 |
 |
With exclusive access to the dressing rooms' girls’ We grabbed a seat, and, airbrush stencils and hand, We set to work. The evening of outrageous fashions and fun altering, put e impossibile aunt authorization..
Lola Fox again Greetings !! 🙂
 |
Ideas for Carnival 2011: Cat – Cat MakeUp Tutorial
by Stefano on Mar.03, 2011, during Body Painting, Events, Make Up
Republish this old guide on how to make a nice makeup feline, always in vogue for those who want to deal with a little carnival’ of joy. E’ You can also change the colors proposed (blue and blue, Pink and rosso) to give the mask a touch of originality !

First of all applied with a sponge, a white light enough on the face (I used the acquacolor) , including the eye, and softening the neck. Then start drawing with the black nose cone, as shown, about respecting the limits given by the vertical line of the eyes and ears of the mid face (red lines).
The mark must be decisive and firm, starting off from the edges of the mouth to get thin and faded face up to the half way line.
 |
 |
E’ important to taking a nose-shaped inverted triangle, the upper lip and a double curve, typical facial feline. In the rest of the face I made a trick based on triangles and curves, to remember a bit’ the stripes of the coat brindle.
 |
 |
In this case, to remember the effect of the hair, I left the poorly defined bodi, created with many small irregular pennellatine.
 |
 |
Finally I marked with a white nose and chin more cargo, I called contornadoli black eyes and stretching a bit’ out, and I scored a mustache with many small dots blacks.
Another effect you can give with sponge (little!) gray / black part of the face remained between the white stripes; This will help to create chiaroscuro effects and make the most basic trick of living.
Accessories such as ear, vampire teeth and colored contact lenses with the eye of the cat will make the mask even more attractive ! =)
Zombie Make Up Tutorial – How to Become a Zombie !
by Stefano on Feb.23, 2011, during Special Effects, Events, Make Up

As promised a few days ago, here are some simple steps to achieve in a short time and with materials readily available from a nice trick Zombie, On the subject saw the carnival imminent or partner if you want to remove some’ troppo assillanti 🙂
Materials needed:
- White base for facepainting (excellent even in the clown makeup cream)
- Black pencil make-up
- Color fire red (well only a lipstick)
- Pre-vulcanized liquid latex (alternatively a layer of toilet paper and PVA glue)
- possibly a correction / economic foundation
How to proceed:
Apply with a sponge in the liquid latex to the cheeks and make it dry using a hair dryer. In the event that you do not have the latex (mesticheria or sell it in stores a few colors €) can be done as follows:
Separated by a piece of toilet paper (or a paper towel) two-ply, tear so that it follows an approximate outline of the cheeks (you could get two more or less oval) and paste to the face, one cheek, using PVA glue as a bonding agent diluted in a bit’ d’acqua, being careful to apply the glue to the side of oval, and not in the middle.
 |
 |
When finished you can proceed to slightly whiten his face, as the most preferred white forehead, the nose and cheekbones.
 |
 |
Apply now some’ black eyes: over the entire upper eyelid and lower eyelid, surrounding the whole eye.
Wait for it to dry out a bit’ (in case you're using water colors) then mix it with a bit’ sfumatelo on lipstick and white: the objective is to achieve a dark purple.
 |
 |
Now, with a pencil or black color on the cheeks create a chiaroscuro: the goal is to give an idea of emptying, then you can proceed to break the latex or toilet paper in vertical strips, coloring the underlying skin with red lipstick, To give an idea of the flesh.
 |
 |
Finally, color the tip of the nose and lips with black.
If you're using a pencil ol'eyeliner can score some interesting cross line, thin lips, not too long, giving the idea of a lip that is breaking.
 |
 |
The concealer or the foundation may be useful at this point if we realize that we have exaggerated with the white or black and white will fade further (apply it to lighten the black, then fade to white).
If we want to add some more details, We can draw two parallel lines on the forehead and round, by then fade out, to give an idea of the passage of a large vein or the skin is breaking.
 |
 |
A red halo around the mouth and stains like blood spatter made will make it more gruesome and terrifying your creation..

Neck and hand colored the same color of the face , and uncombed hair properly and fixed with a bit’ spray or foam to make you worthy of revival from death …

Photo shoot with Eilidh and Daniel Mora
by Stefano on Feb.21, 2011, during Beauty, Events, Make Up
Here are some shots for a photo shoot with Daniel Mora.
 |
 |
The photo shoot was carried out in all external, Parco Ducale in Parma, daylight to a late summer day.
For makeup Eilidh, wanting to obtain a quite natural, I made a clear basis on the face, shaded pink cheeks and cheekbones with a natural and edged black eye, pencil (eyeliner) el'eyeliner lower eyelid removal on the upper eyelid, just above the root of the eyelashes.
I used a purple in poor enough to give off a color tone to the eyes, delicatamanete brushing the upper eyelid, starting from the eye closest to the nose and blend it with a white eye shadow outside corner of the eye, near the end of the arch eyebrows.
The same eyebrows were re-redefined the use of a dark brown pencil, also to make the transition to a nicer hair wig blacks used shortly after, very good in giving a stronger tone to the character and remove it so decided by the fund, Very colorful and bright.
For the second series of shots instead, made towards the sunset, we went back to the classic style, Eilidh for removing the wig to regain its natural brown color, tune with the background color of the trees, and focusing instead on the lips, on with a bright red.
 |
 |
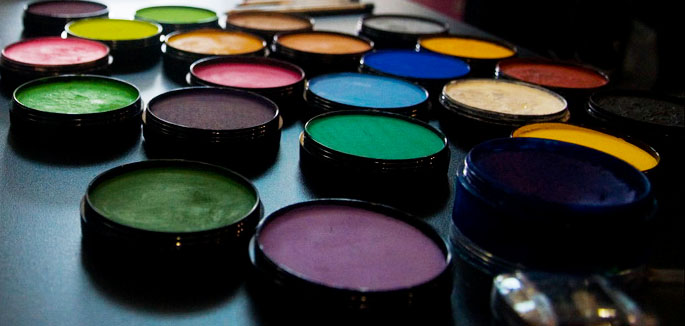
Colors
by Stefano on Feb.09, 2010, during Body Painting
The question I most often is made by the observer (sometimes a bit’ naively) while performing a bodypaint is' What colors are?’ – 'But then come off with water ?’
Having reassured the public and shaping, maybe with a hint of irony ( 'Sure, with some’ acetone is it all away ') Switch off what is often there, with some dismay of the viewer to know that just a little’ soap and water can undermine all the work within minutes of our day.
But we've never really wondered what we in the colors we use, and if we can reproduce ? In fact, the costs of the colors continuously increasing (wafers of AQUACOLOR 4mg in traditional colors, I found yesterday by a dealer authorized to 5,50 Euro l'una!) is pushing more people to walk the path of experimentation.
For better or for worse.
While using food coloring (that plus the easiest to find – be sure not thinking of coloring the skin by using acrylic, true ?!) is the relative security to avoid allergic reactions and skin toxicity (according to the logic of 'if we can eat, surely we can also spread it on ') you still need to pay particular attention that the product is also easy to remove, and do not leave undesirable spots on the skin.
If you want to go a little’ deeper into what, and accurately analyze the contents of a color to BodyPaint, here is the list of ingredients (in order of use):
- Distilled water (in the case of course is based liquid and not waffle)
- Cetearyl Alcohol – Cetearyl alcohol (emollient / emulsifier / stabilizing emulsions / opacizzante / viscosizzante)
- Sodium Laureth Sulfate – also known as SLS (schiumogeno)
- Octyldodecanol – Octildodecanolo (emollient and solvent)
- Cetyl Alcohol – Cetyl Alcohol (emollient / emulsifier / opacizzante / viscosizzante)
- Stearic Acid – Stearic Acid (emulsion / stabilizing emulsions)
- Propylene Glycol – Propylene glycol (umettante / solvent)
- Triethanolamina – Trietanolamina (pH balancing)
- Glycerin – Glycerol (denaturante / umettante / solvent)
- Sodium Laury Sulfate
- Lenath-40
- Sodium Borate – Borace (buffering agent)
- Dimethicone – (antischiuma / emollient)
- Sodium Chloride – Sodium Chloride (viscosizzante)
- Talcum – Talc (absorbent)
- Methylparaben – Metilparaben (preservative)
- Perfume – Perfume
and, depending on the color of one or more of the following colors:
- Titanium Dioxide – Titanium Dioxide (White) Cl 77891
- Iron Oxides and Mica- Metal oxides and mica Cl77491 Cl77499
- yellow5 Cl19140:1
- Ultramarines Cl7707
- Ferric Farrocyanide Cl77510
- Cl Red7 15850
- Red38 Cl12085
- Yellow 6 Cl15985:1
- Red40 Cl16035
- Pigment Yellow 1 Cl11680
- Barium Sulfate Cl77120
Although not all the-shelf components, are quite common, especially in liquid soaps and shampoos.